Shopify
Connect your Shopify store to the WMS to sync stock in real time and pull orders automatically for shipping.
What it does
Connect your Shopify store to the WMS to sync stock in real time and automatically pull orders in for shipping.
How it works
- Stock (WMS → Shopify), automatic: any stock movement in the WMS (receiving, picking, adjustment, transfer) updates Shopify stock within seconds. Updates for the same product are grouped in a 30s window to avoid rate-limits. You can also trigger a full sync with the Sync Stock button, which now runs in the background with live progress, so it no longer times out on large catalogs. Use Force full re-sync to re-push stock for every mapped product, even ones that haven't changed.
- You can choose between two sync modes:
- Absolute | the WMS always overwrites Shopify's stock with the current value (safest once the store is fully configured).
- Delta | only sends the difference since the last sync (recommended when connecting a store for the first time).
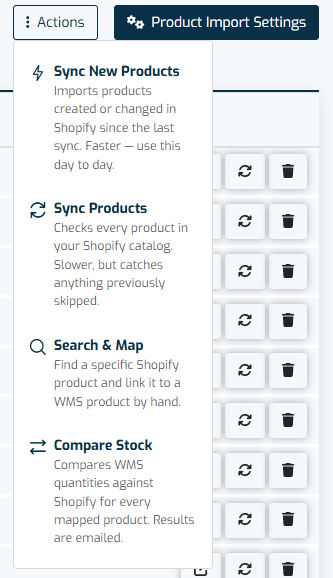
- Products (Shopify → WMS), automatic: products created or updated in Shopify are picked up automatically and mapped to WMS products (by SKU, then by barcode), so you no longer have to run a manual sync every time your catalog changes. When you do want to sync by hand, the product actions menu now offers two options: Sync New Products, which fetches only what was created or changed in Shopify since the last sync (fast, use this day to day), and Sync Products, which checks your entire catalog and catches anything previously skipped (slower). Both match by SKU, then barcode, and also refresh the barcode on products that were already mapped. Product sync never changes stock nor existing mappings.
- One product at a time (Shopify → WMS), on demand: from a single product's Shopify window you can now select Sync from Shopify to re-pull just that product's image and barcode. It's the quickest way to repair a stale or wrong image, or a missing barcode, without syncing the whole catalog. An image you set yourself is always kept | the sync never overwrites a manual image. This action is available to account administrators.
- Orders (Shopify → WMS), automatic: new orders arrive via webhook in real time, filtered by the criteria you set (status, financial, fulfillment).
- Shipping (WMS → Shopify), automatic: when an order is shipped in the WMS, the tracking number is pushed back to Shopify as a fulfillment event. If the carrier integration for that shipment briefly fails, the order is fulfilled right away without tracking, and the tracking number is added automatically once the carrier confirms it.
- Returns: you can enable return sync and automatic closing on Shopify.
- Supports multiple stores in parallel, each with its own locations, mappings and rules.
How to set it up
- Activate the Shopify plugin under Plugins → Marketplaces.
- Click + Add Store, enter your domain (e.g.
your-store.myshopify.com) and authorise the connection when redirected to Shopify. - Under Store Settings, map each Shopify location to a WMS warehouse and shipping process, and mark one as default for new orders.
- Under Product Mapping, run Sync Products for the first full import; afterwards use Sync New Products for quick day-to-day updates.
- If your store was connected before automatic product sync was introduced, click Register Webhooks once so it starts picking up new and updated Shopify products automatically. Only account administrators can see and use this button.
- Define the order filters you want to import and enable stock sync when you're ready.
Important notes
- Product sync never creates stock, it only maps catalogs.
- We recommend starting in Delta mode and switching to Absolute only after you've confirmed stock is correctly configured.
💡 Tip: inside the application, each plugin's configuration page has an Integration Guide button with the detailed technical walk-through.
View the full Shopify integration page